Best Pond Pump Information 2021

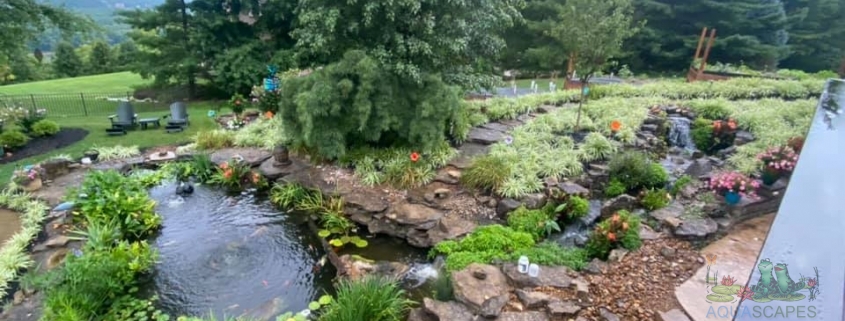
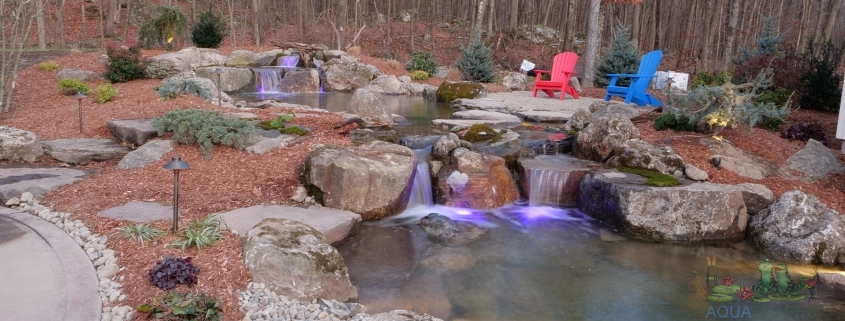
Pumps keep the water in your pond healthy. They help evenly spread nutrients in the water to fish, plants and other aquatic life. Running water prevents stagnation and cuts down on algae and mosquitoes. Keeping the water moving ensures that oxygen levels are distributed throughout the pond. Pumps also provide power for a pond’s water features, like waterfalls and fountains.

This guide will help you learn about the best pond pumps for your garden.

~

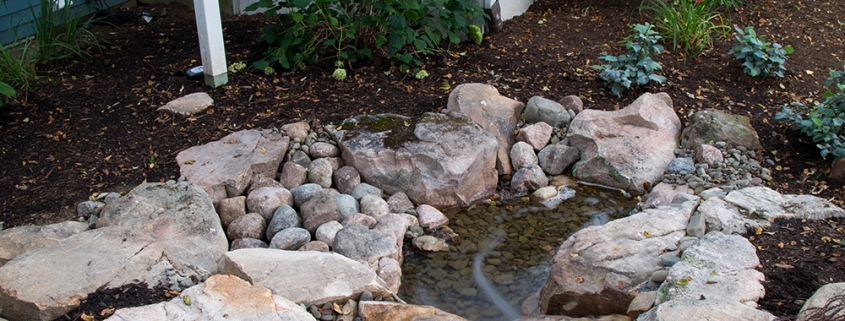
The best water pumps for your pond and its fountain or waterfall come in variety of types and styles. They include submersible, external, magnetic drive and direct drive. Each of these water garden pumps offers its own advantages.

Submersible Pumps: These pumps are designed to work while wholly submerged in water. Typically, they are installed in the deepest part of the pond. Submersible pumps can be placed either directly into your pond or in a skimmer box or pond vault.

  • Easy to install.
  • Work well in environments that capitalize on a natural setting.
  • No need to camouflage the pump.
  • Run very quietly so there’s no distracting noise in your garden.
  • Submersible pumps can be used to drain your pond, if needed.
  • Range in pumping size from 50 to 5,000 gallons per hour.
  • Can generate higher energy costs than other pump types.
  • For smaller ponds, submersible pumps are generally more economical.

Tip: Some submersible pumps use oil to operate. If the pump seal breaks and leaks harmful oil coolant into the water, fish can be hurt or killed. If you have fish or other aquatic life in your pond, you’ll want to look for a submersible model that does not use oil.

External Pumps: External pumps can move a high volume of water, yet usually have lower energy costs than submersible pumps. They are not as quiet as submersible pumps. They should be placed in a dry location near your pond. External pumps are a lot more complicated to install. However, they are generally more reliable.

  • Available as self-priming pumps able to draw their own water.
  • Can be loud, disturbing the quiet of your garden.
  • Work well for larger ponds that are 1,000 gallons or more.
  • Offer long-lasting performance and easy repair.
  • Require less routine maintenance than submersible pumps.

Tip: Pumps that are not self-priming can burn out a motor if the power shuts off momentarily and then comes back on. Protect against this by installing a check valve.

Magnetic Drive: In a magnetic-drive pump, an electrical charge creates a magnetic field that causes the magnet on the impeller to rotate and pump water. Since they have no seals to wear out, they require little maintenance. Occasionally, you will need to clean the impeller and its chamber for the most efficient operation.

  • Completely sealed. Magnetic-drive pumps do not require lubrication.
  • Because they don’t contain oil, magnetic-drive pumps are safer for ponds with fish, since oil leaks don’t occur.
  • Don’t generate high head heights. Magnetic-drive pumps are unable to lift pond water vertically, which you might need to supply water to a fountain. They are not the best water pumps for fountains.
  • Work best in cleaner environments with little or no debris.
  • Highly efficient and cost-effective.

Direct Drive: Direct-drive pumps have an enclosed motor that is powered by electricity, which turns the impeller shaft.

  • Achieve significant head height, so they are able to move water vertically. They are among the best water pumps for fountains and waterfalls.
  • Typically more expensive to operate.
  • Push water rather than pulling it.
  • Not easily repaired.

Tip: Some models seal the motor in an oil-filled shell with seals around the cord and impeller shaft. These are risky to use if you have a pond stocked with fish. There is an ever-present danger of water contamination if a leak occurs. Many newer pumps, however, feature alternative lubrication that is safe for fish. Look for oil-free models if you have fish or other aquatic life in your pond.

AquascapePRO® Pond Pumps

Pond Pump Calculations

Figuring out the correct pump size depends upon the how big your pond is. Other factors include whether or not the pump is being used for filtration, re-circulation or water features. Another factor is the number of fish and plants your pond contains. Larger fish populations have greater air requirements.

A good rule of thumb is that pumps should be able to pump out about half the pond volume every hour. For example, a pump that moves 500 gallons per hour would be appropriate for a 1,000 gallon pond.

You don’t have to refer to a fountain pump size chart to figure out the best water pumps for your garden. With a few measurements and calculations, you can determine the size pump you’ll need.

Flow rate for filtration

  • Filtration flow rate in gallons per hour (gph) = 0.5 x pond volume (gallons)

Flow rate for fountains

  • For every inch of stream width at the top of the fountain, you need 100 gph at the height you’re pumping

Flow rate for waterfalls

  • Light flow = 50 gph x waterfall width (in.)
  • Average flow = 100 gph x waterfall width (in.)
  • Strong flow = 200 gph x waterfalls width (in.)

Pond volume

  • Pond volume (gallons) = 7.5 x average width (ft.) x average length (ft.) x average depth (ft.)

Pond Pump Features

In-line, utility, solids and axial pumps are just a few of the many varieties of water garden pumps that are available.

  • In-line Pumps: These pumps draw water through an inlet that connects to a hose so you can pull water from a remote location. All external pumps are in-line pumps.
  • Utility Pumps: Utility pumps draw water through openings that screen out debris. When placing one into a pond, use a pump sock or other enclosure to reduce the amount of cleaning needed. If you use a pump sock, be aware that sock-like screening can cause a dry pump situation.
  • Solids Pumps: These pumps draw water through a large opening and pump small debris through without clogging. For this reason, they can be placed into a pond without prefilters. This pump type is not safe for ponds with fish, frogs or other aquatic animals, however.
  • Axial Pumps: These special utility pumps are designed for high-flow, low-pressure pond environments. Because they are big, they require piping that is large in diameter.
  • Solar Pumps: Solar-powered pumps perform well in climates with lots of sunshine. They can cost less to operate since they don’t require an outdoor electrical outlet. Solar pumps also work well if your fountain is located far from the power supply. However, flow rate is minimal compared to typical voltage.
  • Heavy-Duty Pumps: Heavy-duty pumps are typically made of stainless steel and are more costly. However, they offer greater energy efficiency and last longer.

You’ll need to consider several factors when deciding between the best water pumps for your garden pond. A pump should be able to handle the size of your pond and support your water features. It also needs to be compatible with any fish or plants you may have.

How Does the IonGen™ Work?

™The IonGen™ G2 electronic water clarifier for Ponds, Pondless® Waterfalls and other decorative water features drastically reduces maintenance of  string algae without the use of chemicals.

  • Significantly decreases string algae that normally attaches to the rocks and gravel throughout the stream, waterfall, and pond.
  • Now EPA Approved for maintenance of string algae.
  • Not a chemical water treatment.
  • Safe to be used with fish and plants
  • Treats up to 25,000 gallons
  • Easy to install with the included selection of fittings and no tools are required to install
  • No tools required for electrical connections using easy to install quick connectors.
  • Includes 15 ft of cable
  • Operate the IonGen at a low ionization level (recommended 2 or 3 setting) and only raise the ionization level when needed.  This prolongs the life of the Probe.  When you have Koi, if you raise the setting, make sure you are testing the water for copper.
  • Energy Efficient – uses less than 1 watt of energy a month

Components:

Control Panel – Touch pads allow the user to adjust the level of copper ions produced based on the condition of the water feature. A microprocessor in the Control Panel sends a signal to the Probe causing the outermost metal atoms of the Probe’s bars to lose an electron creating a positive ion.  The positive ion attempts to flow from one bar to the other and is swept away by the flowing water and dispersing it into the water feature. It is recommended that the monitor panel be mounted.

The Probe – Copper/Metal bars are activated by the control panel and slowly dissolve into the water.  The Probe can be installed directly in the skimmer using the Flow Chamber included with the system.  Should be changed every year in the spring.  If IonGen is not working check the probe as you may need to scrape the oxidation build up on the prongs or replace it if it is wore down.

Installation of the Probe – The Probe can also be installed without the flow chamber by hanging it directly into a filter with good water flow, such as the skimmer.  You might like to use the IonGen G2 Probe Holder which allows installation without Flow Chamber. Straps onto any pipe from 1 to 4 inches in diameter and can be attach to the Check Valve. This allows you to have good water flow for the efficient use of the IonGen.. The Probe is replaceable and will last typically about one season, depending on usage.  The Control Panel will read 00 when the Probe is completely exhausted or if there is a fault in the operation of the system.

Troubleshooting and Questions

  • To adjust the amount of ions – manually raise or lower the ionization level using the + and  – buttons.
  • Full ionization power will exhaust the probe at a faster rate and may cause copper levels to raise which is not healthy for Koi. Keep level around 3.
  • Larger ponds or ponds with poor water conditions will take a longer time to achieve the desired results.
  • When using in a pond, you still must use a beneficial bacteria to keep the balance in your pond.  This item does not clear green water.

The Importance of Understanding Alkalinity to the success of the IonGen™

  • A good range of alkalinity level is between 100-250 mg/L (ppm)
  • Copper ions become ineffective if the alkalinity is about 250 mg/L (ppm)
  • To reduce alkalinity if it is too high is to do a partial water change. Use your alkalinity test kit to make sure the tap water falls between the good Alkalinity range of 100-250 mg/L (ppm)
  • If you have fish, do not operate below 100 mg/L (ppm)!
  • Note, baking soda is an easy way to raise low alkalinity levels.  Adding 1/4 cup per 1,000 gallons will typically raise it by 10 mg/L (ppm). Should be conduced over a period of days.
  • High evaporation can change the alkalinity to a higher rate and continue to elevate as the minerals are left behind and additional minerals are added with the new water used to top off the water feature.
  • Too high of alkalinity may be a reason why you don’t see results with ionization or had good results, but then you will notice it decline later in the season.  To reduce alkalinity if it gets too high is conduct a partial water change.

Why is the ionization light flashing green?  or Why can’t I raise the ionization level to full power in the panel?

This is typically related to insufficient water flow across the probe or insufficient water conductivity. Never operate the IonGen at full power when you have fish.

Solution: 

1.  Make sure the probe is receiving enough water flow.  Try moving the probe around in the filter to increase the flow. If installed directly in the line, there will be more than enough flow.

2. Inspect the probe and remove debris or scrape away scale build up. Bluish green scale indicates insufficient water flow in the location.

Why can’t I raise the ionization level to full power?

G1 solution (panel with bars) – Make sure the red dot on the top of the probe cap is orientated in line with the direction of the water flow.  This will maximize the distribution of ions into the flow of water.

Conductivity in the water may be too low – Verify you have enough flow and inspect the probe.  Still have flashing light or can’t raise the ionization level, you may need to increase the conductivity of the water.  Add a small quantity of Pond Salt (1/2 cup per 100 gallons) to the water.  This raises the conductivity and provides the Control Panel the ability to increase the activation and release of ions.  This method also will increase the rate at which the Probe exhausts.

Lower the ionization levels once desired results are achieved. This prolongs life of probe and makes sure copper level does not exceed 0.25 ppm.

Unnecessarily maintaining the IonGen at full ionization power will exhaust the probe at a faster rate and could be harmful to your fish.

Periodically test the copper level in the water to make sure it does not exceed 0.25 ppm.

Why does my water appear to be stained brown or brownish-green?

This is more than likely the result of organic debris decomposing in the water feature.

Suggestions for clearing the water:

1.  Use a debris net to physically remove organic matter from the bottom of the pond.

2.  Rapid Clear Flocculent clears cloudy or discolored water.  Use in conjunction with Rapid Clear Fine Filter Pad.

3.  SAB Stream and Pond Clean contains bacteria and enzymes to help speed up and complete the bread down of organic debris. Also incudes a powerful phosphate binder.

4.  Water changes.  Remember to a Pond Detoxifier when adding tap water to remove chlorine and chloramines.

Should I operate the IonGen during the Winter?

No, it is recommended to shut down the IonGen system where climates are cold in the winter.  Remove the panel and store inside.


Rain Water Harvesting with the Aquascape RainXchange System

As a nation, we are focusing on preserving our environment and resources by “going green”.  Protecting and preserving our most precious resource…Water.

Clean water is a necessity of all life and the easiest resource to pollute.  One of the easiest ways to help save the environment is to build a rain garden.  A typical rain garden slows down storm water so it has a chance to absorb in the ground.  This rain garden usually looks like a flower garden planted with native plants.  But the problem with this set up is that all areas of the country typically experience periods of a drought.  The solution is a rain harvesting system which will not only capture the water but will store the water for future use.


Why Rainwater harvest?

  • Reduce water bills including city storm sever charges
  • Alleviate demand on municipal systems
  • Avoid strict watering schedules
  • Rainwater is extremely rich in nutrients
  • Using rainwater to irrigate will reduce fertilizer use
  • No chemicals are added to rainwater

Did you know?

  • 1 inch of rainfall on a 1000 sq. ft. residential roof gerates 625 gallons of water that can be reused.
  • That same roof in a region receiving 25 inches of annual rainfall can gerates 15,575 gallons of reuseable water.
  • The average household with a 10,000 square foot lot uses up to 3,000 gallons of water weekly for landscape irrigation.
  • Running a sprinkler for 2 hours can use up to 500 gallons of water.
  • Rain Water Harvesting allows you to collect thousands of gallons of water anywhere, even in the Desert!

How would you reuse rainwater?

  • Landscape irrigation
  • Topping off water features, swimming pools and hot tubs
  • Washing your car, patio or deck
  • Protect property from wildfires
  • Even toilet and laundry water supply

What does a Rain Xchange System Work?  (Click to see video)

  • Downspout Filter – Captures and removes pollutants flushed into the system during a rain event.
  • Connecting Pipe – Carries the water via gravity, to the modular storage basin.
  • Modular Storage Basin – Modular design can be configured to fit a wide variety of applications and settings.  EPDM rubber membrane creates a water-tight basin.
  • Snorkel Vault™ & Centipede® Module – Optimum water utilization within the sytem and a convenient access point for yearly maintenance and cleaning.
  • Overflow Infiltration – Excess rainwater is sent to a storage area that facilitates the infiltration of water into deeper soils and aquifers.
  • Biological Filtration – Beneficial bacteria and enzymes reduce organic waste and pollutants to less toxic substances that can be absorbed by plants.
  • Aquatic Plants – Providing food and shelter for a great number of birds, insects and amphibians and the cornerstone for maintaining biodiversity.
  • Irrigation System – Natural water is located with mocronutrients and compounds that will make plants flourish.

What type of materials are needed to create a rain harvest system?

  • Filter Basin – captures and removes pollutants flushed into system during a rain event
  • 45 mil Liner and underlayment
  • Matrix® units stacked in the basin provide high water storage capacity
  • Pipe and Plumbing Fixtures
  • Wet Well
  • Pump to pull harvested rainwater from the reservoir supplying pressurized water for your use.

Can I incorporate a water feature with my rain harvesting system?

Yes, there are several ways this can be accomplished.

1.  Use of a permeable paver patio in combination with a fountain stone.  The permeable pavers collect the water which feeds the fountain stone and allows access to the water for other irrigation purposes.

2.  A pondless waterfall can use the same basin which is collecting water from the roof harvest system.

The Water Harvesting sytems have many options and sizes.   Having this system professionally installed is recommend.  Water storage system sizes range from 500 gallons to 3000 gallons or over.

Call us today and we will design a system to meet your specifications 877-780-1174


Container Water Gardens

It’s a small world – container water gardens are the perfect fit!

What’s holding you back from digging a hole and adding a perfectly peaceful aquatic paradise to your backyard?  Is it the price? The size? The uncertainty of it all? Will you even like adding water gardening to your list of outdoor hobbies?  How do you make a transition into the wet and wild world of water gardening?

If you are timid about getting starting, you may choose to begin with container gardening.

For people with small backyards or a simple porch, sometimes a container garden is the only way to get their water garden to fit.  For some, it can lead to the dream of a big yard and a bigger water garden.  There seem to be endless ways to accomplish your first water garden.  Some examples are:

Wet Rocks or Bubbling Rocks, – these rocks are drilled so that the water comes out of the top and cascades down the rock into a basin below the rock.  Many installers will do these in singles and trios.  When the proper selection of the rock, you can get a nice soft sound of the water.  Check with your local installer for further information and ultimately a proposal. Great for a nice additional to a small landscaped area.

On the market are several types of containers.  This would be a category that you would have the ability to add plants and maybe small fish to this container.  Traditionally, we only saw the whiskey barrel and liner tub available but now the market offers you other options which include different sizes, shapes and colors of container, container gardening pump, and tubing.  Here’s a link to the ones available  from Aquascapes.

shop fountains

Now consider plants as they can turn any boring container into a gorgeous work of art, if you educate yourself about how to plant and which plants to use.  As with any water garden there are three basic type of plants:

1.  Water lilies – recommend only the pygmy water lily which still may be too big.

2.  Marginal – perennial plants – which be careful to only purchase the smaller marginal plants. Suggestions are:

Variegated sweet flag, corkscrew rush, Four-leaf clover, water forget me not – Just remember to keep them small

3.  Floating plants – Tropical – Water Hyacinth (my favorite) and Water Lettuce (does not like real hot climates) Great for small features.

Gold Fish are an option but remember they will grow to about 6 inches and will reproduce.  They will not live through the winter in a fountain or small basin.

What equipment do I need?

You will need a container garden aerator.   This is a small pump that will give a gentle turbulence to the water.  You want to steer clear of still water as this is a breeding grounds for mosquitoes.  Add a small amount of gravel/stones on the bottom of the container.  Especially if you have added a few fish.

What kind of maintenance is required?

Maintenance is as easy or as hard as you want to make it.  Many of the small containers are small enough that you may use a garden hose to top it off.  And if there’s no fish, you may use it to overflow the system for severe cleaning.  If debris does accumulate, you can use any of the enzyme-based products (algaecides).  Sludge tablets would be a good source and our bacteria container garden tablets.  Watch for evaporation and if you have fish, you may need to put a few drops of detoxifer in the water. This removes the chlorine from the water if you have fish.

Enjoy!  Be careful, however, because once the water gardening bug has bitten you, there’s no going back!  Next step, would be a micro pond kit, then on to a larger water garden.  Well, actually, it’s best just to go to the largest water garden you can put into your location and fits your budget.  We do have kits for the do-it-yourselfers but best results are locating a installer in your area.  Call us at 877 780-1174 and we can help you find that contractor.

Or if just a fountain is your choice for now look at the options on our site.


Have a question? Ready to order? Want to install a pond? Contact us!

0 + 8 = ?