[av_heading heading=’Pondless Waterfall Plans’ tag=’h1′ link_apply=” link=’manually,http://’ link_target=” style=’blockquote modern-quote modern-centered’ size=” subheading_active=” subheading_size=’15’ margin=” margin_sync=’true’ padding=’10’ color=” custom_font=” av-medium-font-size-title=” av-small-font-size-title=” av-mini-font-size-title=” av-medium-font-size=” av-small-font-size=” av-mini-font-size=” av_uid=’av-l5r42squ’ custom_class=” admin_preview_bg=”][/av_heading]
[av_textblock size=” font_color=” color=” av-medium-font-size=” av-small-font-size=” av-mini-font-size=” av_uid=’av-16zpjxz’ custom_class=” admin_preview_bg=”]
Quick 5 Step Guide for Pondless Waterfall Plans
[/av_textblock]
[av_hr class=’short’ height=’50’ shadow=’no-shadow’ position=’center’ custom_border=’av-border-thin’ custom_width=’50px’ custom_border_color=” custom_margin_top=’30px’ custom_margin_bottom=’30px’ icon_select=’yes’ custom_icon_color=” icon=’ue808′ font=’entypo-fontello’ av_uid=’av-1g8xv87′ admin_preview_bg=”]
[av_one_half first min_height=” vertical_alignment=” space=” custom_margin=” margin=’0px’ link=” linktarget=” link_hover=” padding=’0px’ border=” border_color=” radius=’0px’ background=’bg_color’ background_color=” background_gradient_color1=” background_gradient_color2=” background_gradient_direction=’vertical’ src=” background_position=’top left’ background_repeat=’no-repeat’ animation=” mobile_breaking=” mobile_display=” av_uid=’av-1ermaaf’]
[av_textblock size=” font_color=” color=” av-medium-font-size=” av-small-font-size=” av-mini-font-size=” av_uid=’av-1c5tfxj’ custom_class=” admin_preview_bg=”]
If you’re looking for a way to add a water feature to your landscape without all the maintenance of a traditional pond, a pondless waterfall may be the perfect solution. Pondless waterfalls are relatively easy to install and can be customized to fit any size space. Plus, they offer all the beauty and relaxing sound of running water without the worry of leaks or overflowed ponds.
[/av_textblock]
[/av_one_half][av_one_half min_height=” vertical_alignment=” space=” custom_margin=” margin=’0px’ link=” linktarget=” link_hover=” padding=’0px’ border=” border_color=” radius=’0px’ background=’bg_color’ background_color=” background_gradient_color1=” background_gradient_color2=” background_gradient_direction=’vertical’ src=” background_position=’top left’ background_repeat=’no-repeat’ animation=” mobile_breaking=” mobile_display=” av_uid=’av-1bwjq1j’]
[av_image src=’https://aquascapes.com/wp-content/uploads/2018/05/Backyard-Waterfall_3-300×200.jpg’ attachment=’8189′ attachment_size=’medium’ align=’center’ styling=” hover=” link=” target=” caption=” font_size=” appearance=” overlay_opacity=’0.4′ overlay_color=’#000000′ overlay_text_color=’#ffffff’ copyright=” animation=’no-animation’ av_uid=’av-19ndwuv’ custom_class=” admin_preview_bg=”][/av_image]
[/av_one_half][av_hr class=’invisible’ height=’50’ shadow=’no-shadow’ position=’center’ custom_border=’av-border-thin’ custom_width=’50px’ custom_border_color=” custom_margin_top=’30px’ custom_margin_bottom=’30px’ icon_select=’yes’ custom_icon_color=” icon=’ue808′ font=’entypo-fontello’ av_uid=’av-1g8xv87′ custom_class=” admin_preview_bg=”]
[av_textblock size=” font_color=” color=” av-medium-font-size=” av-small-font-size=” av-mini-font-size=” av_uid=’av-1c5tfxj’ custom_class=” admin_preview_bg=”]
To get started, check out this step-by-step guide on how to build a pondless waterfall. With just a little planning and some basic materials, you can create your own backyard oasis in no time!
[/av_textblock]
[av_one_full first min_height=” vertical_alignment=” space=” custom_margin=” margin=’0px’ link=” linktarget=” link_hover=” padding=’0px’ border=” border_color=” radius=’0px’ background=’bg_color’ background_color=” background_gradient_color1=” background_gradient_color2=” background_gradient_direction=’vertical’ src=” background_position=’top left’ background_repeat=’no-repeat’ animation=” mobile_breaking=” mobile_display=” av_uid=’av-17z8hlz’]
[av_toggle_container initial=’1′ mode=’toggle’ sort=” styling=’av-minimal-toggle’ colors=’custom’ font_color=’#7bb0e7′ background_color=’#ffffff’ border_color=’#7bb0e7′ hover_colors=’custom’ hover_background_color=’#7bb0e7′ hover_font_color=’#ffffff’ colors_current=’custom’ font_color_current=’#7bb0e7′ background_current=’bg_color’ background_color_current=’#ffffff’ background_gradient_current_color1=” background_gradient_current_color2=” background_gradient_current_direction=’vertical’ av_uid=’av-l5r4gb15′ custom_class=”]
[av_toggle title=’1. Choose Your Location’ tags=”]
The first step is to pick the perfect spot for your pondless waterfall. Keep in mind that you’ll need access to a power outlet and a level surface that can accommodate the size of your waterfall. Once you’ve found the perfect spot, mark out the area with some landscaping paint or flags.
[/av_toggle]
[av_toggle title=’2. Excavate The Area’ tags=”]
Next, you’ll need to excavate the area for your pondless waterfall. This hole should be about two feet deep and three feet wide. If you’re planning on adding any plants or rocks around your waterfall, make sure to leave enough space for them when excavating.
[/av_toggle]
[av_toggle title=’3. Install The Pondless Waterfall Kit’ tags=”]
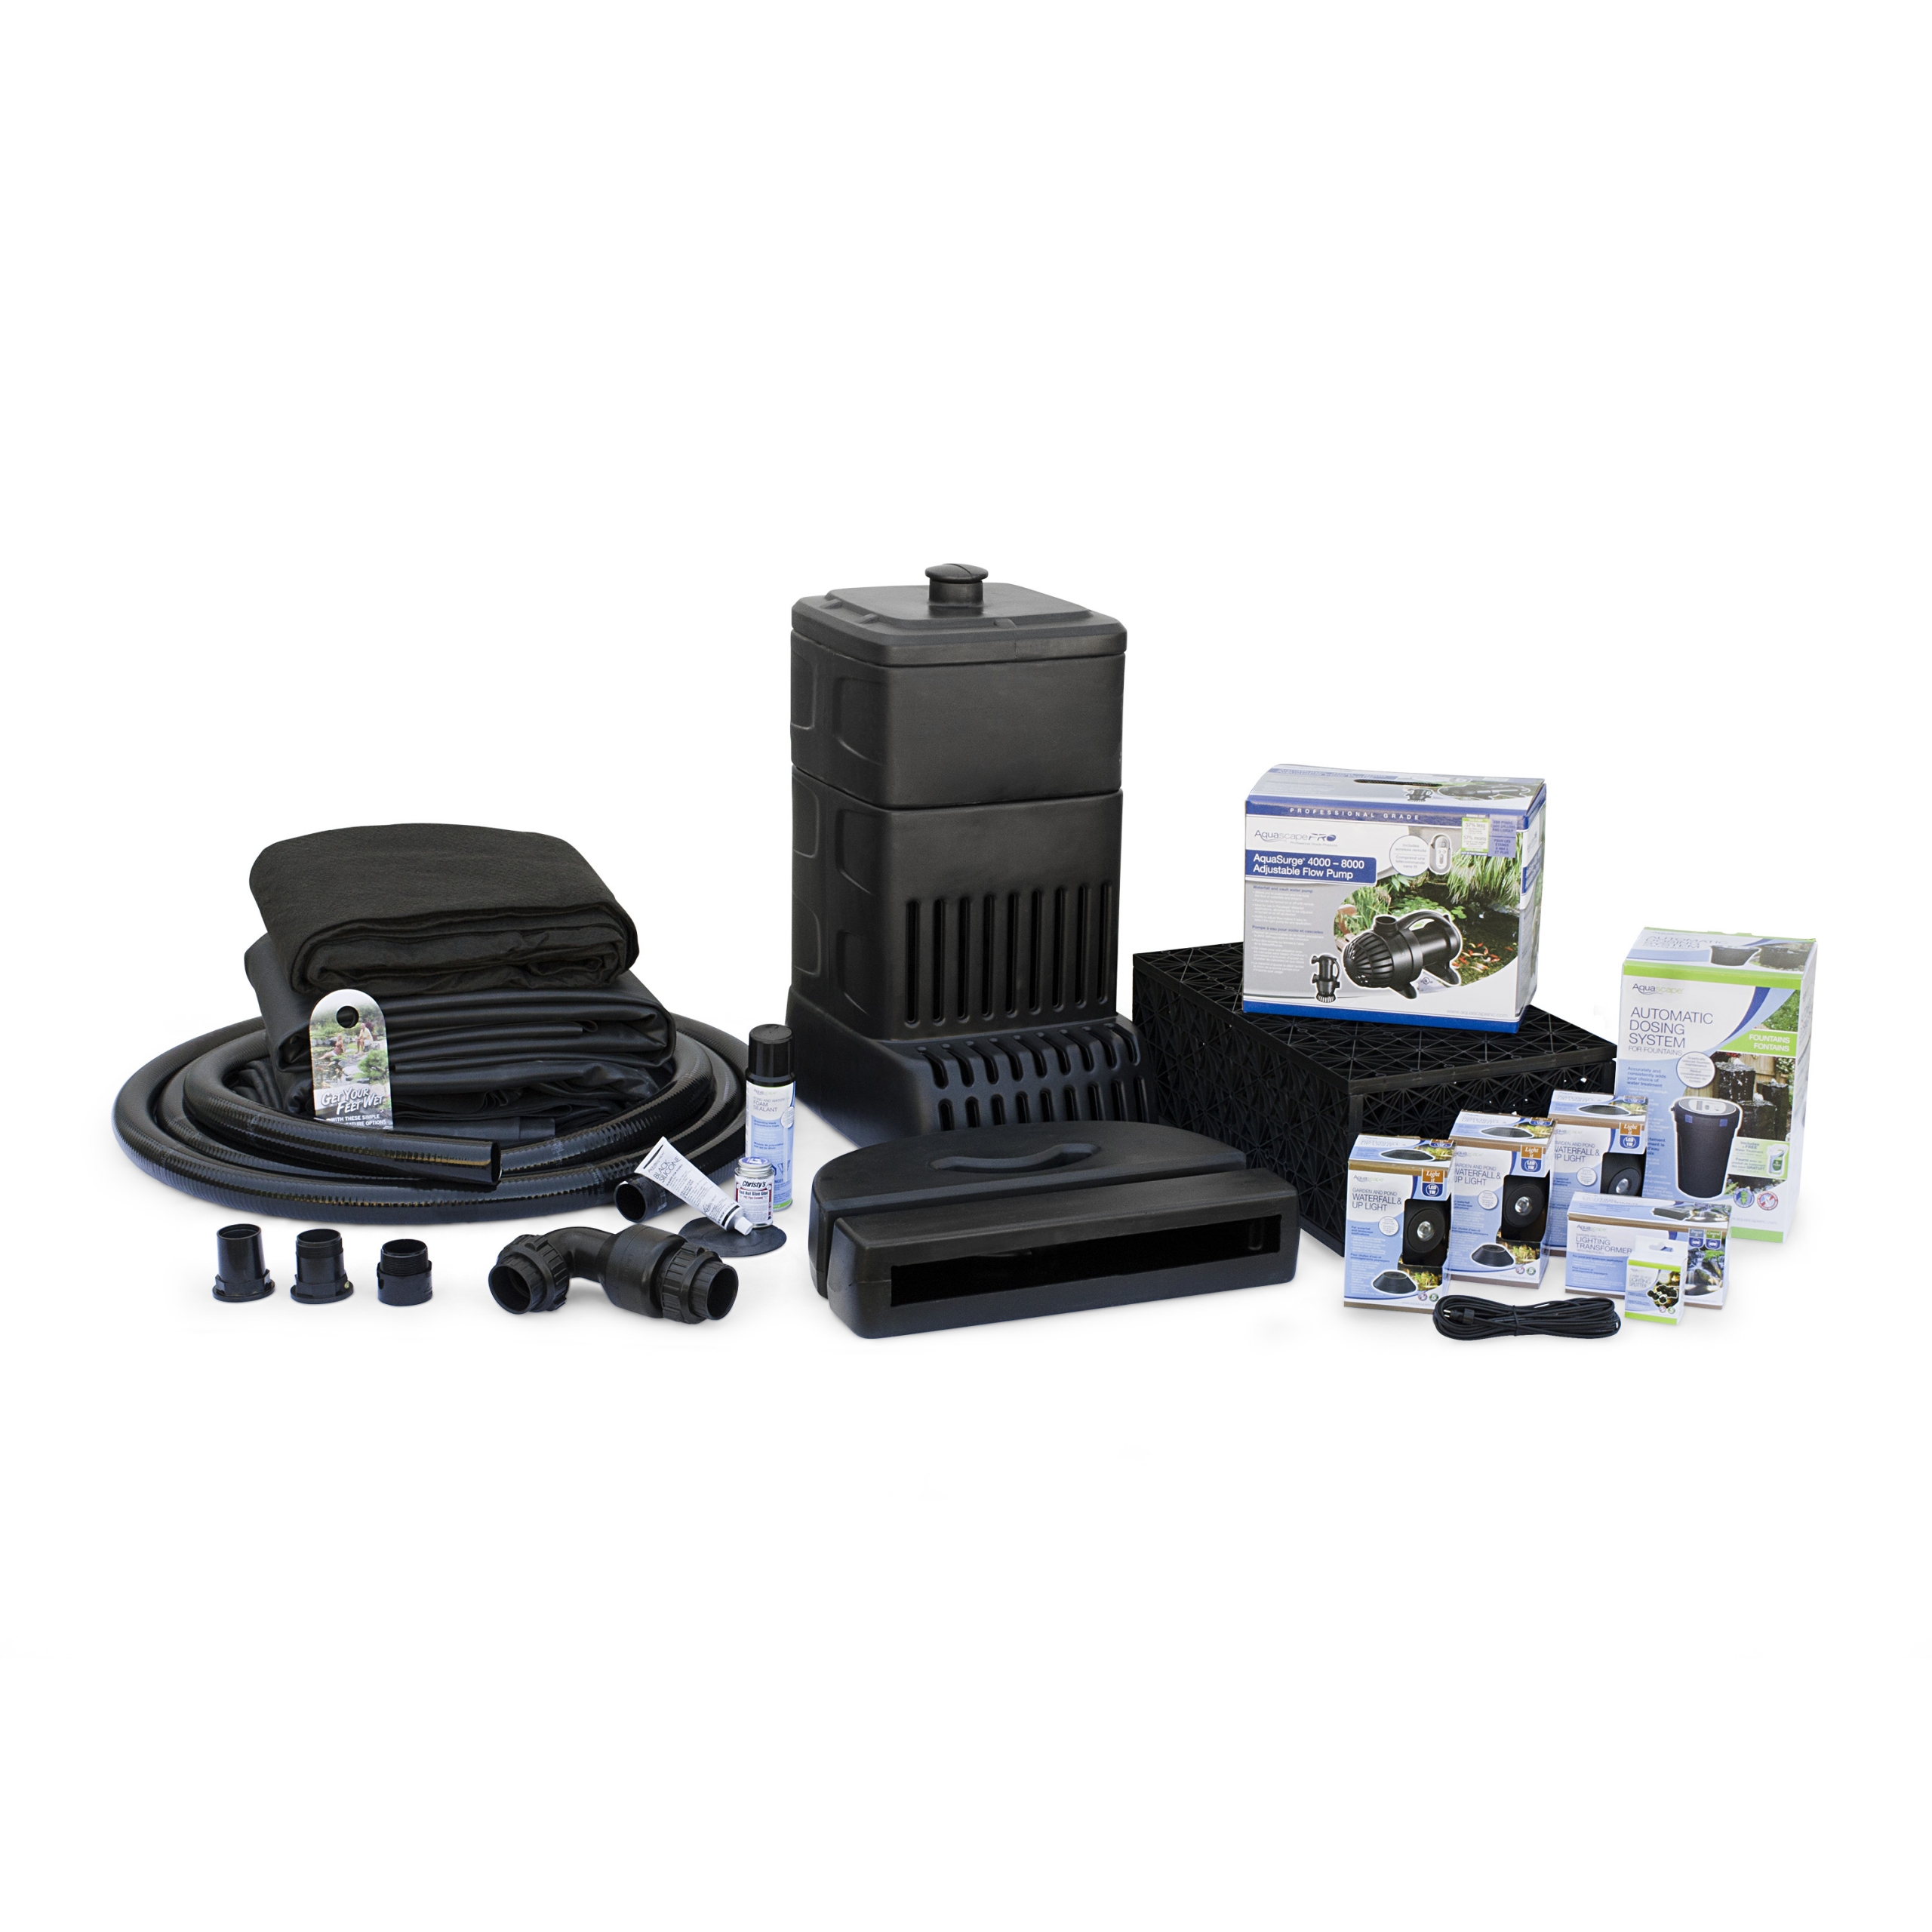
Now it’s time to install your pondless waterfall kit. This kit will come with everything you need to build your waterfall, including a pump, liner, and stones. Follow the instructions that come with your kit to assemble everything. We sell a variety of these pondless waterfall kits in our store if you would like to DIY!
[/av_toggle]
[av_toggle title=’4. Add The Water’ tags=”]
Once your pondless waterfall kit is installed, it’s time to add water. Start by filling the basin with a hose or bucket. Then, turn on the pump and let the water flow!
[/av_toggle]
[av_toggle title=’5. Decorate Your Pondless Waterfall’ tags=”]
Now that your pondless waterfall is up and running, it’s time to decorate it! You can add rocks, plants, and even fish to make it your own personal oasis. Get creative and have fun!
[/av_toggle]
[/av_toggle_container]
[/av_one_full][av_hr class=’full’ height=’50’ shadow=’shadow’ position=’left’ custom_border=’av-border-thin’ custom_width=’50px’ custom_border_color=” custom_margin_top=’30px’ custom_margin_bottom=’30px’ icon_select=’yes’ custom_icon_color=” icon=’ue808′ font=’entypo-fontello’ av_uid=’av-1g8xv87′ custom_class=” admin_preview_bg=”]
[av_one_full first min_height=” vertical_alignment=” space=” custom_margin=” margin=’0px’ link=” linktarget=” link_hover=” padding=’0px’ border=” border_color=” radius=’0px’ background=’bg_color’ background_color=” background_gradient_color1=” background_gradient_color2=” background_gradient_direction=’vertical’ src=” background_position=’top left’ background_repeat=’no-repeat’ animation=” mobile_breaking=” mobile_display=” av_uid=’av-10y8z8n’]
[av_textblock size=” font_color=” color=” av-medium-font-size=” av-small-font-size=” av-mini-font-size=” av_uid=’av-108iu6v’ custom_class=” admin_preview_bg=”]
Thanks for reading at Meyer Aquascapes! We hope you’ve enjoyed our post on garden pond design. Please leave a comment below if you liked it or have any questions. We’d love to hear from you! Thanks for stopping by!
[/av_textblock]
[/av_one_full]
[av_hr class=’short’ height=’50’ shadow=’no-shadow’ position=’center’ custom_border=’av-border-thin’ custom_width=’50px’ custom_border_color=” custom_margin_top=’30px’ custom_margin_bottom=’30px’ icon_select=’yes’ custom_icon_color=” icon=’ue808′ font=’entypo-fontello’ av_uid=’av-4bnqpz’ admin_preview_bg=”]
[av_heading heading=’How can we help?’ tag=’h1′ link_apply=” link=” link_target=” style=’blockquote modern-quote modern-centered’ size=” subheading_active=” subheading_size=’15’ margin=” padding=’10’ color=” custom_font=” custom_class=” admin_preview_bg=” av-desktop-hide=” av-medium-hide=” av-small-hide=” av-mini-hide=” av-medium-font-size-title=” av-small-font-size-title=” av-mini-font-size-title=” av-medium-font-size=” av-small-font-size=” av-mini-font-size=”][/av_heading]
[av_textblock size=” font_color=” color=” av-desktop-hide=” av-medium-hide=” av-small-hide=” av-mini-hide=” av-medium-font-size=” av-small-font-size=” av-mini-font-size=” av_uid=’av-334avi’]
[/av_textblock]