[av_heading heading=’Pondless Waterfall Step by Step Guide’ tag=’h1′ link_apply=” link=’manually,http://’ link_target=” style=’blockquote modern-quote modern-centered’ size=” subheading_active=” subheading_size=’15’ margin=” margin_sync=’true’ padding=’10’ color=” custom_font=” av-medium-font-size-title=” av-small-font-size-title=” av-mini-font-size-title=” av-medium-font-size=” av-small-font-size=” av-mini-font-size=” av_uid=’av-l978545e’ custom_class=” admin_preview_bg=”][/av_heading]
[av_hr class=’short’ height=’50’ shadow=’no-shadow’ position=’center’ custom_border=’av-border-thin’ custom_width=’50px’ custom_border_color=” custom_margin_top=’30px’ custom_margin_bottom=’30px’ icon_select=’yes’ custom_icon_color=” icon=’ue808′ font=’entypo-fontello’ av_uid=’av-1g8xv87′ admin_preview_bg=”]
[av_one_full first min_height=” vertical_alignment=” space=” custom_margin=” margin=’0px’ link=” linktarget=” link_hover=” padding=’0px’ border=” border_color=” radius=’0px’ background=’bg_color’ background_color=” background_gradient_color1=” background_gradient_color2=” background_gradient_direction=’vertical’ src=” background_position=’top left’ background_repeat=’no-repeat’ animation=” mobile_breaking=” mobile_display=” av_uid=’av-1ermaaf’]
[av_textblock size=” font_color=” color=” av-medium-font-size=” av-small-font-size=” av-mini-font-size=” av_uid=’av-1c5tfxj’ custom_class=” admin_preview_bg=”]
This is a pondless waterfall step by step guide. Are you thinking about adding a pondless waterfall to your backyard? If so, you’re not alone. Pondless waterfalls are becoming increasingly popular, as they offer all the beauty of a traditional waterfall without the hassle of maintenance. Plus, they’re much easier to install than a traditional pond!
[/av_textblock]
[/av_one_full]
[av_hr class=’short’ height=’50’ shadow=’no-shadow’ position=’center’ custom_border=’av-border-thin’ custom_width=’50px’ custom_border_color=” custom_margin_top=’30px’ custom_margin_bottom=’30px’ icon_select=’yes’ custom_icon_color=” icon=’ue808′ font=’entypo-fontello’ av_uid=’av-1g8xv87′ custom_class=” admin_preview_bg=”]
[av_textblock size=” font_color=” color=” av-medium-font-size=” av-small-font-size=” av-mini-font-size=” av_uid=’av-1c5tfxj’ custom_class=” admin_preview_bg=”]
If you’re interested in learning how to make a pondless waterfall, we’ve got you covered. In this complete guide, we’ll walk you through the entire process step by step. We’ll start by discussing the supplies you’ll need and then move on to walk you through each stage of installation. By the end of this guide, you’ll know everything you need to create a stunning pondless waterfall that will be the envy of your neighborhood!
So, what are you waiting for? Let’s get started!
[/av_textblock]
[av_hr class=’full’ height=’50’ shadow=’shadow’ position=’left’ custom_border=’av-border-thin’ custom_width=’50px’ custom_border_color=” custom_margin_top=’30px’ custom_margin_bottom=’30px’ icon_select=’yes’ custom_icon_color=” icon=’ue808′ font=’entypo-fontello’ av_uid=’av-1g8xv87′ custom_class=” admin_preview_bg=”]
[av_one_half first min_height=” vertical_alignment=” space=” custom_margin=” margin=’0px’ link=” linktarget=” link_hover=” padding=’0px’ border=” border_color=” radius=’0px’ background=’bg_color’ background_color=” background_gradient_color1=” background_gradient_color2=” background_gradient_direction=’vertical’ src=” background_position=’top left’ background_repeat=’no-repeat’ animation=” mobile_breaking=” mobile_display=” av_uid=’av-17z8hlz’]
[av_textblock size=” font_color=” color=” av-medium-font-size=” av-small-font-size=” av-mini-font-size=” av_uid=’av-16zpjxz’ custom_class=” admin_preview_bg=”]
Basic supplies needed for pondless waterfall step by step guide:
- Aquascape Ultra Pump Kit
- Aquascape Ecosystems Pondless Waterfall Vault
- Aquascape EcoBlox and Underlayment Kit
- Aquascape Decorative Stone
- Aquascape Artificial Logs
- Aquatic Plants
[/av_textblock]
[/av_one_half]
[av_one_half min_height=” vertical_alignment=” space=” custom_margin=” margin=’0px’ link=” linktarget=” link_hover=” padding=’0px’ border=” border_color=” radius=’0px’ background=’bg_color’ background_color=” background_gradient_color1=” background_gradient_color2=” background_gradient_direction=’vertical’ src=” background_position=’top left’ background_repeat=’no-repeat’ animation=” mobile_breaking=” mobile_display=” av_uid=’av-emsnr’]
[av_image src=’https://aquascapes.com/wp-content/uploads/2018/05/Dressander-Geneva-9.jpg’ attachment=’8168′ attachment_size=’full’ align=’center’ styling=” hover=” link=” target=” caption=” font_size=” appearance=” overlay_opacity=’0.4′ overlay_color=’#000000′ overlay_text_color=’#ffffff’ copyright=” animation=’no-animation’ av_uid=’av-12i4q2v’ custom_class=” admin_preview_bg=”][/av_image]
[/av_one_half]
[av_textblock size=” font_color=” color=” av-medium-font-size=” av-small-font-size=” av-mini-font-size=” av_uid=’av-16zpjxz’ custom_class=” admin_preview_bg=”]
OR
Pick up the necessities in one package right here on our website! Don’t worry, we have plenty of complete pondless waterfall packs that will serve pretty much any purpose you have in mind. You can always give us a call if you need help figuring things out. We know it can be difficult and/or frustrating! However, if you LOVE to DIY, we doubt you’ll need help! Check out our Pondless Waterfall Kits here. Since these products are specialized to meet your specific needs, we’ll gather a bit of information from you over the phone, then place the order. We always want to ensure you receive the right product, the first time, every time! Give us a call at 877-780-1174 and we’ll get one of our Aquascape Pondless Waterfall Kits out to you!
If you are interested in how Pondless Waterfalls work, and some design ideas, check out our page on How Do Pondless Waterfalls Work?
[/av_textblock]
[av_hr class=’short’ height=’50’ shadow=’shadow’ position=’left’ custom_border=’av-border-thin’ custom_width=’50px’ custom_border_color=” custom_margin_top=’30px’ custom_margin_bottom=’30px’ icon_select=’yes’ custom_icon_color=” icon=’ue808′ font=’entypo-fontello’ av_uid=’av-1g8xv87′ custom_class=” admin_preview_bg=”]
[av_heading heading=’Complete Step by Step Pondless Waterfall Guide’ tag=’h2′ link_apply=” link=’manually,http://’ link_target=” style=’blockquote modern-quote modern-centered’ size=” subheading_active=” subheading_size=’15’ margin=” padding=’10’ color=” custom_font=” custom_class=” admin_preview_bg=” av-desktop-hide=” av-medium-hide=” av-small-hide=” av-mini-hide=” av-medium-font-size-title=” av-small-font-size-title=” av-mini-font-size-title=” av-medium-font-size=” av-small-font-size=” av-mini-font-size=”][/av_heading]
[av_textblock size=” font_color=” color=” av-medium-font-size=” av-small-font-size=” av-mini-font-size=” av_uid=’av-16zpjxz’ custom_class=” admin_preview_bg=”]
Step 1: Planning your pondless waterfall
The first step in creating your pondless waterfall is to plan the design. You’ll need to decide on the size, shape, and location of your pondless waterfall. Once you have a general idea of what you want, you can begin to gather the supplies needed.
Step 2: Excavating the area for your pondless waterfall
Once you have all of your supplies, it’s time to start excavating the area where your pondless waterfall will be located. You’ll need to dig a hole that is large enough to accommodate the pump and liner. The depth of the hole will depend on the height of your waterfall. Generally speaking, you’ll want the hole to be about two feet deep for every foot of height.
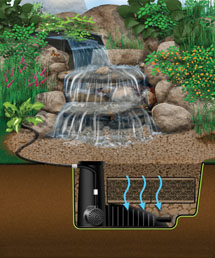
Step 3: Installing the Pondless Waterfall Vault
After you’ve excavated the hole, it’s time to install the Pondless Waterfall Vault. This product is essential for creating a proper pondless waterfall. It will help to support the weight of the waterfall and liner while also providing a place for excess water to drain.
Step 4: Installing the pump and tubing
Once the Pondless Waterfall Vault is in place, you can start installing the pump and tubing. First, connect the pump to the tubing. Then, run the tubing from the pump to the top of your waterfall. Make sure that the tubing is properly secured so that it doesn’t leak.
Step 5: Adding stone around the pondless waterfall vault
Now that the pump and tubing are installed, you can begin adding stone around the Pondless Waterfall Vault. This will help to create a natural-looking waterfall. Start by placing larger stones around the base of the vault. Then, fill in the gaps with smaller stones.
Step 6: Installing the liner
After you’ve added the stone around the Pondless Waterfall Vault, it’s time to install the liner. This will help to create a watertight seal and prevent leaks. Start by unrolling the liner and placing it inside the vault. Then, use rocks or bricks to weigh down the liner and keep it in place.
Step 7: Adding water to your pondless waterfall
Now that the liner is installed, you can begin adding water to your pondless waterfall. Start with a few inches of water and then add more as needed. Be sure to check the level of the water regularly so that it doesn’t get too low.
Step 8: Planting aquatic plants around your pondless waterfall
Once the water has been added to your pondless waterfall, you can start planting aquatic plants around it. This will help to create a natural-looking environment. Choose plants that are tolerant of both wet and dry conditions.
Step 9: Adding artificial logs or rocks
If you want, you can add artificial logs or rocks to your pondless waterfall. This will help to create a more realistic appearance. Be sure to use logs or rocks that are made specifically for use in ponds.
Step 10: Enjoying your pondless waterfall!
Once you’ve completed all of the steps, you can sit back and enjoy your beautiful pondless waterfall! Be sure to check the level of the water regularly and add more as needed. You may also want to consider adding fish or other aquatic creatures to your pondless waterfall.
Check out our store for all your water gardening needs! Aquascape products are Aquascape Inc. Certified.
[/av_textblock]
[av_one_full first min_height=” vertical_alignment=” space=” custom_margin=” margin=’0px’ link=” linktarget=” link_hover=” padding=’0px’ border=” border_color=” radius=’0px’ background=’bg_color’ background_color=” background_gradient_color1=” background_gradient_color2=” background_gradient_direction=’vertical’ src=” background_position=’top left’ background_repeat=’no-repeat’ animation=” mobile_breaking=” mobile_display=” av_uid=’av-10y8z8n’]
[av_textblock size=” font_color=” color=” av-medium-font-size=” av-small-font-size=” av-mini-font-size=” av_uid=’av-108iu6v’ custom_class=” admin_preview_bg=”]
Thanks for reading at Meyer Aquascapes! We hope you’ve enjoyed our pondless waterfall step by step guide! Please leave a comment below if you liked it or have any questions. We’d love to hear from you! Thanks for stopping by!
[/av_textblock]
[/av_one_full]
[av_hr class=’short’ height=’50’ shadow=’no-shadow’ position=’center’ custom_border=’av-border-thin’ custom_width=’50px’ custom_border_color=” custom_margin_top=’30px’ custom_margin_bottom=’30px’ icon_select=’yes’ custom_icon_color=” icon=’ue808′ font=’entypo-fontello’ av_uid=’av-4bnqpz’ admin_preview_bg=”]
[av_heading heading=’How can we help?’ tag=’h1′ link_apply=” link=” link_target=” style=’blockquote modern-quote modern-centered’ size=” subheading_active=” subheading_size=’15’ margin=” padding=’10’ color=” custom_font=” custom_class=” admin_preview_bg=” av-desktop-hide=” av-medium-hide=” av-small-hide=” av-mini-hide=” av-medium-font-size-title=” av-small-font-size-title=” av-mini-font-size-title=” av-medium-font-size=” av-small-font-size=” av-mini-font-size=”][/av_heading]
[av_textblock size=” font_color=” color=” av-desktop-hide=” av-medium-hide=” av-small-hide=” av-mini-hide=” av-medium-font-size=” av-small-font-size=” av-mini-font-size=” av_uid=’av-334avi’]
[/av_textblock]