Pond kits are an excellent solution for creating a peaceful and aesthetically pleasing water feature in your garden. They typically include everything you need to build your own pond, from the pond liner to the pump and filter system. Whether you want to install a small decorative pond or a larger water feature, following a structured process can ensure a successful installation. Here’s a detailed guide to help you install your pond kit.
Materials and Tools You’ll Need to Install Pond Kits
- Pond kit (usually includes liner, pump, filter, waterfall box, tubing, and fittings)
- Shovel or spade
- Garden hose
- Level
- Sand or underlayment (optional)
- Large rocks or boulders (for landscaping)
- Bucket for excess soil
- Garden hose for water source
- Electrical supply (for the pump)
Step 1: Choose the Right Location
Before you begin, select the ideal spot for your pond. The location should offer a combination of sun and shade (about 5-6 hours of sun is ideal) and be away from trees to prevent debris from falling into the water. You’ll also want to place it close to an electrical outlet for your pump and filter.
Pro Tip: Use a garden hose or string to outline the shape of your pond before you start digging. This helps visualize the size and placement.
Step 2: Excavate the Pond Area for Pond Kit Installation
Once you’ve chosen your location and outlined the shape of your pond, it’s time to start digging.
- Excavate in Layers: Start digging along the outline, going about 18-24 inches deep for a medium-sized pond. Create shelves at different levels where aquatic plants can sit. These shelves typically range from 6-12 inches deep, while the bottom layer can be deeper to accommodate the pump.
- Remove Excess Soil: As you dig, remove the soil and use it to create a berm for your waterfall or stream if the pond kit includes one.
- Level the Edges: Make sure the edges of the pond are level. You can check this using a carpenter’s level.
Step 3: Install the Pond Liner
Once the hole is dug, the next step is to install the pond liner. How to install pond kits:
- Smooth the Surface: Before placing the liner, remove any sharp objects such as rocks or roots from the hole to prevent punctures. You can add a layer of sand or an underlayment for extra protection.
- Drape the Liner: Unfold the liner and drape it over the hole. Make sure the liner extends beyond the pond’s edges by at least 12 inches. This will allow for adjustments and prevent shifting.
- Smooth Out Wrinkles: As you press the liner into the pond, smooth out as many wrinkles as possible. While small wrinkles are okay, large ones could affect the appearance and integrity of your pond.
Step 4: Install the Pump and Filter
Your pond kit will come with a pump and filter to keep the water clean and circulating. Install these components according to the manufacturer’s instructions.
- Place the Pump: Place the pump at the deepest point of the pond. Be sure to leave enough slack in the electrical cord to easily access the pump for maintenance.
- Install the Filter and Tubing: Depending on the type of filter, it may be installed inside the pond or externally. Attach the tubing from the pump to the filter and to any waterfall or water feature included in the kit.
Step 5: Add Water and Adjust the Liner
Now it’s time to fill your pond with water.
- Fill Slowly: Start filling the pond with water using a garden hose. As the water fills, adjust the liner to ensure it conforms smoothly to the shape of the pond. Check to make sure the edges of the liner are level.
- Check the Fit: Once the pond is filled, walk around and make sure the liner sits evenly without too much stretching or sagging.
Step 6: Secure the Liner and Add Rocks
With the pond full of water and the liner in place, you can now secure the edges and begin landscaping.
- Secure the Liner: Fold the excess liner over the edge of the pond, then secure it with rocks, bricks, or other decorative materials. This not only holds the liner in place but also hides it for a more natural look.
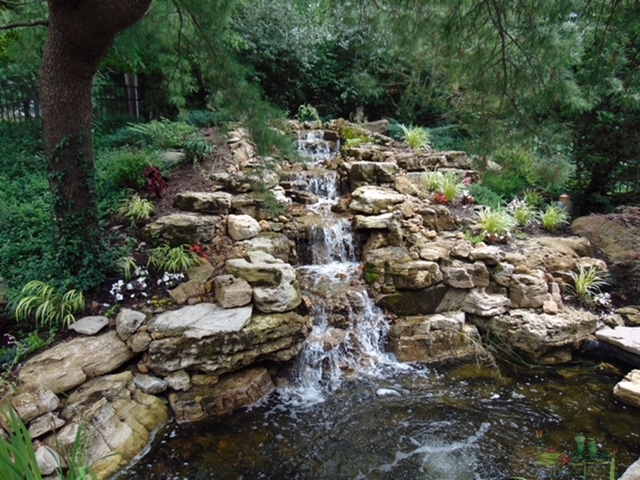
- Add Rocks and Gravel: Use large rocks or boulders around the edges of the pond and on the shelves. This helps create a natural appearance and provides hiding places for fish. You can also add gravel to the bottom of the pond to help anchor the liner and keep it from shifting.
Step 7: Landscaping and Final Touches, How to Install Pond Kits
Once the pond itself is installed, it’s time to add plants, decorative elements, and any additional landscaping features.
- Add Aquatic Plants: Plants like lilies, lotuses, or marginal plants thrive in ponds and help maintain a healthy water balance by absorbing nutrients.
- Create a Waterfall or Stream: If your kit includes a waterfall or stream, position the waterfall box or spillway at the desired height and direction. You may need to adjust rocks and plants around it for aesthetic and practical reasons.
- Install Lighting (Optional): Submersible LED lights can enhance the beauty of your pond, especially at night.
Step 8: Test the Pump and Filter
After setting up the pond, it’s time to turn on the pump and filter to ensure everything is working smoothly.
- Check Water Circulation: Once the pump is running, check the flow of water from the pump to the waterfall or other feature. Adjust the positioning if necessary.
- Monitor the Water: In the first few days, keep an eye on the water level and any potential leaks. Some water loss is natural due to evaporation, but significant drops in water level might indicate a problem with the liner.
Step 9: Maintain Your Installed Pond Kit
Proper pond maintenance is key to ensuring a healthy and visually appealing water feature. Regularly clean the filter, remove debris like leaves, and monitor the water quality.
Installing a pond kit can be a rewarding and fulfilling DIY project, transforming your backyard into a peaceful retreat. By following these steps, you’ll ensure a smooth installation process and a pond that you can enjoy for years to come. Whether you opt for a small, simple pond or one with a waterfall, the end result will be a beautiful feature that adds tranquility and value to your outdoor space.
Tips and Tricks for Installing Pond Kits
Installing a pond kit can be a smooth and enjoyable process, but a few additional tips can help ensure the project goes off without a hitch. Here are some expert tips and tricks to get the most out of your pond kit installation:
1. Plan for Pond Depth and Size
- Fish or No Fish? If you plan to keep fish, especially koi, ensure your pond is deep enough (at least 2-3 feet) to give them room to grow and to prevent freezing in winter.
- Bigger is Better: Many pond owners wish they had built a larger pond. If possible, build a slightly bigger pond than you originally planned. You’ll appreciate the extra space later for plants, fish, and decorative features.
2. Create an Uneven Edge
- Instead of making a perfectly symmetrical or round pond, give the edge a natural, irregular shape. This will make the pond blend more naturally with its surroundings.
3. Use Multiple Levels
- Create several shelves or ledges for plants at different depths. This adds visual interest and allows you to incorporate a variety of aquatic plants, each suited to different water depths. It also provides stepping stones for wildlife, such as birds or frogs, to access the water.
4. Rinse Rocks Before Using
- Wash all rocks and gravel thoroughly before adding them to your pond. Unwashed rocks can introduce dirt and debris that will cloud the water and clog your filter.
5. Test Your Water Source
- If using tap water to fill your pond, treat it with a water conditioner to neutralize harmful chemicals like chlorine. If you’re unsure about your water’s quality, test it first to avoid issues with fish or plants.
6. Hide Tubing and Cables
- As you install the pump and waterfall tubing, carefully position rocks or plants to hide any visible tubing or electrical cables. This will create a cleaner, more natural look.
7. Use Underlayment for Extra Protection
- For added protection, place an underlayment beneath your pond liner to prevent punctures from rocks and roots. Old carpeting, newspaper, or specialized pond underlayment can help.
8. Consider Adding a Skimmer
- Adding a skimmer (if your kit doesn’t include one) helps keep the water surface clean by trapping leaves and debris. This will reduce maintenance and keep your pond looking pristine.
9. Seasonal Considerations
- If you live in an area with harsh winters, be mindful of freeze-thaw cycles. Leave some slack in the liner to allow for expansion. Consider adding a pond heater or aerator to keep a small section of water ice-free, allowing gases to escape and protecting fish.
10. Check Electrical Safety
- Always use a GFCI (Ground Fault Circuit Interrupter) outlet to power your pond pump. This ensures the electrical system is safe around water and protects against electrical hazards.
11. Allow the Pond to Settle Before Adding Fish
- Give your pond a few days to settle after installation before introducing fish or plants. This will allow the water to stabilize and ensure the pump and filtration systems are working properly.
12. Use a Pond Vacuum for Cleaning
- A pond vacuum can be incredibly helpful for periodic cleaning, especially in larger ponds. It removes debris without having to drain the water.
13. Plan for Future Maintenance
- When positioning the pump, filter, and tubing, ensure you can easily access these components for routine maintenance. Avoid burying them under heavy rocks or plants, as you’ll need to clean or replace them periodically.
By following these tips and tricks, you’ll not only make the pond installation process easier but also ensure your pond remains a beautiful and healthy feature in your garden for years to come!